Followers

Friday, 15 June 2012

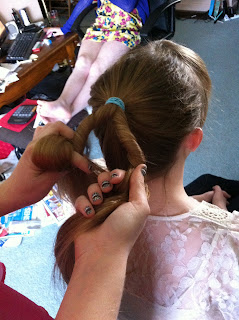
Twisting Waterfall Braid

For my last blog post I have decided to do a hairstyle that is a little more complicated but I find it is the prettiest one that I have chosen to blog about. To do this hairstyle takes a little more patience to do but it is just as easy as the other hairstyles posted. It looks tricky but if you follow the steps it should be no problem at all...ENJOY!

 
Tools you will need:
-A brush
-Bobby pins

Step One: Brush your hair and make sure you have no knots.
Step Two: Gather two pieces of hair in the front of your face just like you would do with a braid, but only with two.
Step Three: Twist the strands upwards (or clockwise) so that your top strand is now on the bottom.
Step Four: You are now going to release the strand at the bottom and gather a new strand from the top. This now makes your top strand your bottom one.  
Step Five: Now you twist upwrds again, releasing your bottom strand and grabbing a new one from the top of your head.
Step Six: Repeat these steps until you reach the back of your head and bobby pin the very last strand.
Step Seven: Now do this to the other side of your head and when you get to the back, bobby pin it as well.
NOTE: WHEN BOBBY PINNING YOUR FINAL STRANDS, MAKE SURE TO GET THE AS CLOSE TOGETHER AS YOU CAN TO HIDE THE BOBBY PINS AND HIDE THE GAP.

Knotted Ponytail

This hairstyle can either be done for a casual occasion or dressed up for a more formal event. If you are waking up late or going out with friends this hairstyle is easy and quick to do.


Tools you will need:
-A brush
-A comb
-A hair elastic

Step one: For a formal look you should brush your hair until it is smooth. For a more casual look leave hair messy.

Step Two: Divide your hair into two sections to the side of your head.

Step Three: Cross your hair into a basic knot.

Step Four: Repeat this step about 2-3 times depending on the length of your hair.

Step Five: Secure hair under the last knot to assure your hair does not fall out.

Step Six: If you are going for a formal look, take your comb and stroke hair down to get rid of any fly aways. If this is going to be a casual look for you, tak your comb and tease the ponytail upwards for a messy look.

Hidden Ponytail

This hairstyle is a very simple fix to flyaway hairs. It takes maybe 40 seconds to do and it looks fabulous!


Tools you will need:
-A brush
-A hair elastic
-A bobby pin


Step One: Brush your hair to the nape of your neck so it is centered.

Step Two: Secure your hair with a hair elastic in a low ponytail.

Step Three: Take a small strand and warcp it around the elastic so you can not see it anymore.

Step Four: To keep that strand in place take a bobby pin and attach it from behind.

VOILA! You are finished!

Thursday, 14 June 2012

Twist Bun

This is my favourite hairstyle to do becaus eit is easy and quick. If you only have five minutes in the morning and you have bed head like crazy then this is your quick fix!


Tools you will need:
-A brush
-A bobby pin (or two)

Step One: Brush your hair and make sure it is smooth.

Step Two: Gather your hair on the top of your hair in a pony tail, but do not secure it with an elastic.

Step Three. Start to twist the strand, you should feel it starting to pull. At this point you should let it wrap around itself .

Step Four: Once it is completely wrapped around secure the end with a bobby pin and it should stay in place.


NOTE: If you have long or thick hair it may take more than one bobby pin to keep all of your hair in place. If bobby pins do not work you can always substitute them with a hair elastic the same colour as your hair.


Mermaid Braid

This hairstyle is such an easy and beautiful way to switch things up. If you are sick of always doing a boring three strand braid all the time, this is a creative way to make a simple braid look more complex. It is really so simple that you will pick it up in no time!


Tools you will need:
-A brush
-Three small hair elastics
-A bunch of bobby pins
-Bows or flowers of your choice


Step One: Brush your hair to the side of your head and divide into two sections.


Step Two: Move one section out of the way. putting it up with a clip is a wuick way to do this so it doesn't get in the way.


Step Three: Braid the section that is down inot a simple three strand braid and secure it with an elastic.


Step Four: Release the other section of hair and do the same thing so you have two simple three strand braids beside eachother.


Step Five: Now you want to take the two braids and connect them. To do so you are going to take them and put them together, then take a bobby pin and from the back you are going to secure the two braids.


Continue this step down the entire braid.


Step Six: When you ge tot the end of the braids, secure both of the braids together with your third elastic, but just above the other two. When that is in place, remove.


Step Seven: This is the part where you can go the extra mile if you want to be creative. to dress this look up and make it perfect for summer you can add any flowers, bows or hair clips you desire.

Tuesday, 5 June 2012

Fishtail Braid

This hairstyle may seem a little tricky to do but it's really just as simple as a normal braid. Personally, I like to fancy this one up with flower pins or bows because my hair has layers and I tend to have pieces sticking out everywhere and the pins help keep things in place.


Tools you will need:
-A brush
-A hair elastic
-Clips or bows (if desired)


Step 1) Brush your hair so it is smooth and knot free. If you are doing this to your own hair it is easier to do it to the side because you will have more control over what you are doing and you can see if you make any mistakes.


Step 2) Separate hair into two strands.


Step 3) From one of the sections you are going to take a
smaller strand of hair from the outside.


Step 4) Cross the strand over to the other section of hair and combine it with the opposite section.


Step 5) Now you are going to want to continue to repeat this step but alternating the side you take hair from.


Step 6) Make sure you are keeping the strands tightly together so it doesn't fall apart.


Step 7) When you get to the end and can't cross your hair without small pieces sticking out, secure your hair with a small hair elastic.


Step 8) When you are finished you should end up with a successful fishtail braid. Now if you want to make this hairstyle
fancier, you can just add any hairclip of your choice.


Friday, 1 June 2012

Twist Braid

This hairstyle is a little tricky to get used to but once you have practiced a few times it is a piece of cake! So don't get discouraged if you can't get it the first try, it took me 10 times before I got it to work. It is perfect to wear casuallyby having it loose or you can glam it up if you are going out by sleeking back all of your hair and making it higher than usual.


Tools you will need:
-A brush
-Two hair elastics


Step 1) Brush your hair and put it into a ponytail(a high ponytail is recommended). Then separate your hair into two strands.


Step 2) Start twisting both strands clockwise. (NOTE: If they are not going the same way the braid will not work!)


Step 3) After twisting the two strands you are going to feel them pulling. At this point you are going to cross the two strands counter clockwise.


Step 4) Continue to repeat steps two and three all the way down to the end of your hair.


Step 5) Once you have gotten to the end of the braid, secure the bottom of your hair with a hair elastic.


Note: If the twisting was done properly the braid should not untwist. It should stay without having to pin it all in place.